项目环境搭建
纵观江湖,搭建一座Spring Boot项目,实为易如反掌,大可有二法:
首法,在 spring 之乡,或 阿里巨头之邦,得获其提供之脚手架工具,登高一呼,则代码自动落肆。可犹阔以在网页上操作,简揽诸多选项,而后手握IDE,便可快捷地揭开项目的序幕。次法,则为手搭之方,倚重于Maven、Gradle,或Ant等构筑工巧。我在此略列其要领(惟就Maven而言):初辟工程,谓之立项目;嵌入Spring Boot依赖,诸如spring-boot-starter-parent父项,及spring-boot-starter-web等,需一一批注于pom.xml中。主启动类亦异曲同工,以@SpringBootApplication为尊,义不容辞;从而顺着股肱血脉,引领开发之路:
- 创建一个新的Maven项目:在你的IDE中,选择创建一个新的Maven项目。确保你已经安装了Maven,并配置好了相关环境变量。
- 添加Spring Boot依赖:在项目的pom.xml文件中,添加Spring Boot的依赖。
<dependencies>
        <dependency>
            <groupId>org.springframework.boot</groupId>
            <artifactId>spring-boot-starter-web</artifactId>
            <version>2.3.2.RELEASE</version>
        </dependency>
 </dependencies>
或者
<parent>
        <groupId>org.springframework.boot</groupId>
        <artifactId>spring-boot-starter-parent</artifactId>
        <version>2.3.2.RELEASE</version>
    </parent>

    <dependencies>
        <dependency>
            <groupId>org.springframework.boot</groupId>
            <artifactId>spring-boot-starter-web</artifactId>
        </dependency>
    </dependencies>
或者
<parent>
        <groupId>org.springframework.boot</groupId>
        <artifactId>spring-boot-dependencies</artifactId>
        <version>2.3.2.RELEASE</version>
    </parent>

    <dependencies>
        <dependency>
            <groupId>org.springframework.boot</groupId>
            <artifactId>spring-boot-starter-web</artifactId>
        </dependency>
    </dependencies>
纵观这三种写法,实质上是相同的。spring-boot-dependencies和spring-boot-starter-parent本身并不提供任何依赖关系。spring-boot-dependencies通过定义dependencyManagement节点来管理相关的依赖项,从而使子项目能够忽略这些依赖项的版本号。spring-boot-starter-parent则是一种特殊的启动器,它在spring-boot-dependencies的基础上添加了一些Maven的默认配置和插件版本管理。 而在dependencies中增加了spring-boot-starter-web依赖项,它会自动引入Web项目所需的一些基本依赖,从而让我们可以开始开发自己的业务了。
3.编写主启动类:在项目中创建一个主启动类,作为springboot应用的入口点。
@RestController
@EnableAutoConfiguration
public class Example {


    @GetMapping("/")
    String test() {
        return "Hello World!";
    }

    public static void main(String[] args) {
        SpringApplication.run(Example.class);
    }
}
顷刻便可启动整个项目,到浏览器中博览一番,再将业务逻辑铸成,便可依托巨室,傲视群雄,谱写自己的传奇。
若是仍有不解之谜,惟有再次请教也。
启动流程
整个应用通过这行代码启动
SpringApplication.run(Example.class);正好最近因为工作需要搭建了源码环境,让我们直接跟进源码(以下截取代码都来自官方源码2.3.x分支)
public static ConfigurableApplicationContext run(Class<?>[] primarySources, String[] args) {
		return new SpringApplication(primarySources).run(args);
	}
这里就做了两件事 先new一个SpringApplication实例,然后再启动。
继续:
/**
	 * Create a new {@link SpringApplication} instance. The application context will load
	 * beans from the specified primary sources (see {@link SpringApplication class-level}
	 * documentation for details. The instance can be customized before calling
	 * {@link #run(String...)}.
	 * @param resourceLoader the resource loader to use
	 * @param primarySources the primary bean sources
	 * @see #run(Class, String[])
	 * @see #setSources(Set)
	 */
	@SuppressWarnings({ "unchecked", "rawtypes" })
	public SpringApplication(ResourceLoader resourceLoader, Class<?>... primarySources) {
		//这个和bean的加载有关 暂且不表
		this.resourceLoader = resourceLoader;
		Assert.notNull(primarySources, "PrimarySources must not be null");
		/**
		 * 主资源类,会优先加载{@link #getAllSources() 使用LinkedHashSet保证顺序}
		 */
		this.primarySources = new LinkedHashSet<>(Arrays.asList(primarySources));
		//根据classpath类文件判断当前是否是web应用 以及具体是哪种web环境(servlet和reactive)
        //比如上面Example就是servlet类型,像微服务的springcloud gateway就是基于reactive实现的
		this.webApplicationType = WebApplicationType.deduceFromClasspath();
		//获取环境中的所有ApplicationContextInitializer和ApplicationListener
		setInitializers((Collection) getSpringFactoriesInstances(ApplicationContextInitializer.class));
		setListeners((Collection) getSpringFactoriesInstances(ApplicationListener.class));
		/**
		 * 通过获取当前调用栈,找到入口方法main所在的类,使用的是{@link RuntimeException#getStackTrace()}
		 * 学到了!
		 */
		this.mainApplicationClass = deduceMainApplicationClass();
	}
根据代码和注释可以了解到,这个构造方法主要是做了一些初始化工作,初始化了对象的成员变量resourceLoader,primarySources,wevApplicationType,mainApplicationClass,initializers,listeners.主要看一下initializers,listeners这两个变量的构造流程:
private <T> Collection<T> getSpringFactoriesInstances(Class<T> type, Class<?>[] parameterTypes, Object... args) {
		ClassLoader classLoader = getClassLoader();
		// Use names and ensure unique to protect against duplicates
		//获取spring factories的名称集合,然后根据名字和类型通过构造方法构造出实例,最终按@Order注解标注的顺序排序后返回
		//可以去源码的META-INF/spring.factories资源文件中看一下这些类的定义
		Set<String> names = new LinkedHashSet<>(SpringFactoriesLoader.loadFactoryNames(type, classLoader));
		List<T> instances = createSpringFactoriesInstances(type, parameterTypes, classLoader, args, names);
		AnnotationAwareOrderComparator.sort(instances);
		return instances;
	}
可以看出先通过SpringFactoriesLoader.loadFactoryNames方法获取spring factories的名称集合,
private static final Map<ClassLoader, MultiValueMap<String, String>> cache = new ConcurrentReferenceHashMap<>();

private static Map<String, List<String>> loadSpringFactories(@Nullable ClassLoader classLoader) {
		MultiValueMap<String, String> result = cache.get(classLoader);
		if (result != null) {
			return result;
		}

		try {
			Enumeration<URL> urls = (classLoader != null ?
					classLoader.getResources(FACTORIES_RESOURCE_LOCATION) :
					ClassLoader.getSystemResources(FACTORIES_RESOURCE_LOCATION));
			result = new LinkedMultiValueMap<>();
			while (urls.hasMoreElements()) {
				URL url = urls.nextElement();
				UrlResource resource = new UrlResource(url);
				Properties properties = PropertiesLoaderUtils.loadProperties(resource);
				for (Map.Entry<?, ?> entry : properties.entrySet()) {
					String factoryTypeName = ((String) entry.getKey()).trim();
					for (String factoryImplementationName : StringUtils.commaDelimitedListToStringArray((String) entry.getValue())) {
						result.add(factoryTypeName, factoryImplementationName.trim());
					}
				}
			}
			cache.put(classLoader, result);
			return result;
		}
		catch (IOException ex) {
			throw new IllegalArgumentException("Unable to load factories from location [" +
					FACTORIES_RESOURCE_LOCATION + "]", ex);
		}
	}
然后根据名字和类型通过构造方法构造出实例,最终按@Order注解标注的顺序排序后返回。
下面来到今天的重点run方法:
/**
* Run the Spring application, creating and refreshing a new
* {@link ApplicationContext}.
*
* @param args the application arguments (usually passed from a Java main method)
* @return a running {@link ApplicationContext}
*/
public ConfigurableApplicationContext run(String... args) {
//1.创建计时器 开始计时
// spring里的计时器工具,用于测量代码块的执行时间,支持重复使用,但是注意该对象不是设计为线程安全的
StopWatch stopWatch = new StopWatch();
stopWatch.start();
ConfigurableApplicationContext context = null;
//这段代码的作用是确保在运行应用程序时,"java.awt.headless"属性被正确地配置。
// 这个属性通常用于指示Java应用程序是否运行在无图形用户界面(GUI)的环境中。
// 通过配置这个属性,可以在不同的环境中正确地设置Java应用程序的图形处理方式,以确保应用程序能够在不同的环境中正确地运行。
configureHeadlessProperty();
/**
*
*初始化所有SpringApplicationRunListener的实现,目前只看到{@link EventPublishingRunListener#starting()}
*后面会根据时机依次调用started、environmentPrepared、contextPrepared、running方法
*/
SpringApplicationRunListeners listeners = getRunListeners(args);
listeners.starting();
try {
//初始化启动参数
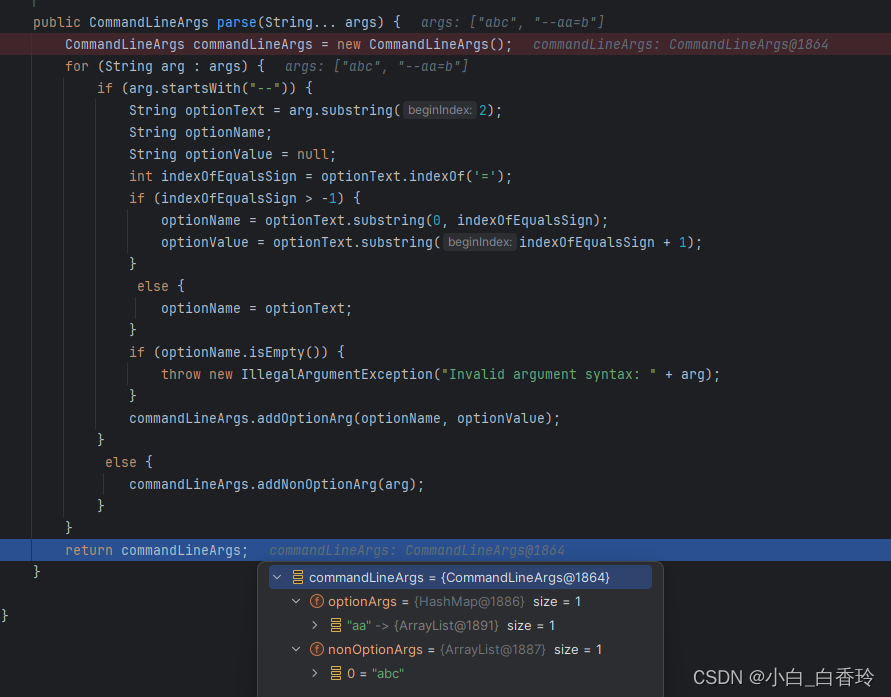
/**
* 可以看一下{@link org.springframework.core.env.SimpleCommandLineArgsParser}类里解析参数的逻辑
* 分为optionArgs和nonOptionArgs
*/
ApplicationArguments applicationArguments = new DefaultApplicationArguments(args);
//准备环境
ConfigurableEnvironment environment = prepareEnvironment(listeners, applicationArguments);
//设置spring.beaninfo.ignore配置,没有则设为True
configureIgnoreBeanInfo(environment);
//根据bannerMode属性判断是否打印banner
Banner printedBanner = printBanner(environment);
/**
* 根据web类型创建并获取上下文对象
* servlet-{@link org.springframework.boot.web.servlet.context.AnnotationConfigServletWebServerApplicationContext}
* reactive-{@link org.springframework.boot.web.reactive.context.AnnotationConfigReactiveWebServerApplicationContext}
*/
context = createApplicationContext();
/**
初始化器SpringApplication中的initializers{@link ApplicationContextInitializer}逐一初始化
初始化所有SpringApplicationRunListener的实现,目前只看到{@link EventPublishingRunListener#contextPrepared(ConfigurableApplicationContext)} ()}
将applicationArguments和printedBanner以及前面提到primarySource注册为单例实例到容器中
*/
prepareContext(context, environment, listeners, applicationArguments, printedBanner);
//注册关闭钩子函数到JVM支持程序的优雅关闭
refreshContext(context);
afterRefresh(context, applicationArguments);
stopWatch.stop();
if (this.logStartupInfo) {
new StartupInfoLogger(this.mainApplicationClass).logStarted(getApplicationLog(), stopWatch);
}
listeners.started(context);
//按顺序逐一调用所有ApplicationRunner.run方法和CommandLineRunner.run方法
callRunners(context, applicationArguments);
} catch (Throwable ex) {
handleRunFailure(context, ex, listeners);
throw new IllegalStateException(ex);
}
try {
listeners.running(context);
} catch (Throwable ex) {
handleRunFailure(context, ex, null);
throw new IllegalStateException(ex);
}
return context;
}1.创建计时器
2.设置headless模式
3.加载SpringApplicationRunListener实现并依次执行starting方法
在启动的过程中,会根据时机依次调用started、environmentPrepared、contextPrepared、running方法
4.解析命令行参数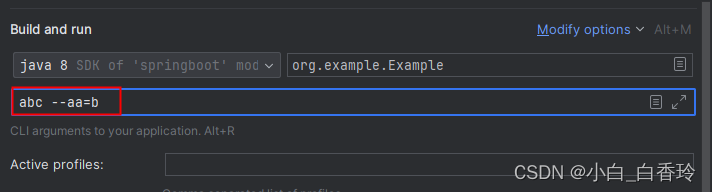
5.准备环境
private ConfigurableEnvironment prepareEnvironment(SpringApplicationRunListeners listeners,
			ApplicationArguments applicationArguments) {
		// Create and configure the environment
		//根据webApplicationType类型创建对应运行环境
		//servlet-StandardServletEnvironment,reactive-StandardReactiveWebEnvironment,其他-StandardEnvironment
		ConfigurableEnvironment environment = getOrCreateEnvironment();
		/**
		 * 配置环境
		 * 1. 根据配置需要,为环境初始化 {@link ConversionService}主要作用是提供一种统一的方式来进行类型转换,无论是基本数据类型之间的转换,还是复杂对象之间的转换,都可以通过ConversionService来实现。它可以用于将一个类型的值转换为另一个类型,比如将字符串转换为整数、将日期转换为字符串等。
		 * 2. 将命令行参数作为{@link PropertySource}加到propertySources列表中去
		 * 3. 读取spring.profiles.active配置,加到activeProfiles属性
		 * 4. 将
		 */
		configureEnvironment(environment, applicationArguments.getSourceArgs());
		ConfigurationPropertySources.attach(environment);
		/**
		 *
		 * 当环境准备好后全量执行{@link SpringApplicationRunListener#environmentPrepared(ConfigurableEnvironment)}
		 */
		listeners.environmentPrepared(environment);
		bindToSpringApplication(environment);
		if (!this.isCustomEnvironment) {
			environment = new EnvironmentConverter(getClassLoader()).convertEnvironmentIfNecessary(environment,
					deduceEnvironmentClass());
		}
		ConfigurationPropertySources.attach(environment);
		return environment;
	}
6.准备上下文
/**
	 * Run the Spring application, creating and refreshing a new
	 * {@link ApplicationContext}.
	 *
	 * @param args the application arguments (usually passed from a Java main method)
	 * @return a running {@link ApplicationContext}
	 */
	public ConfigurableApplicationContext run(String... args) {
		//1.创建计时器 开始计时
		// spring里的计时器工具,用于测量代码块的执行时间,支持重复使用,但是注意该对象不是设计为线程安全的
		StopWatch stopWatch = new StopWatch();
		stopWatch.start();

		ConfigurableApplicationContext context = null;
		//这段代码的作用是确保在运行应用程序时,"java.awt.headless"属性被正确地配置。
		// 这个属性通常用于指示Java应用程序是否运行在无图形用户界面(GUI)的环境中。
		// 通过配置这个属性,可以在不同的环境中正确地设置Java应用程序的图形处理方式,以确保应用程序能够在不同的环境中正确地运行。
		configureHeadlessProperty();

		/**
		 *
		 *初始化所有SpringApplicationRunListener的实现,目前只看到{@link EventPublishingRunListener#starting()}
		 *后面会根据时机依次调用started、environmentPrepared、contextPrepared、running方法
		 */

		SpringApplicationRunListeners listeners = getRunListeners(args);
		listeners.starting();
		try {
			//初始化启动参数
			/**
			 * 可以看一下{@link org.springframework.core.env.SimpleCommandLineArgsParser}类里解析参数的逻辑
			 * 分为optionArgs和nonOptionArgs
			 */
			ApplicationArguments applicationArguments = new DefaultApplicationArguments(args);
			//准备环境
			ConfigurableEnvironment environment = prepareEnvironment(listeners, applicationArguments);
			//设置spring.beaninfo.ignore配置,没有则设为True
			configureIgnoreBeanInfo(environment);
			//根据bannerMode属性判断是否打印banner
			Banner printedBanner = printBanner(environment);
			/**
			 * 根据web类型创建并获取上下文对象
			 * servlet-{@link org.springframework.boot.web.servlet.context.AnnotationConfigServletWebServerApplicationContext}
			 * reactive-{@link org.springframework.boot.web.reactive.context.AnnotationConfigReactiveWebServerApplicationContext}
			 */
			context = createApplicationContext();
			/**
			 初始化器SpringApplication中的initializers{@link ApplicationContextInitializer}逐一初始化
			 初始化所有SpringApplicationRunListener的实现,目前只看到{@link EventPublishingRunListener#contextPrepared(ConfigurableApplicationContext)} ()}
			 将applicationArguments和printedBanner以及前面提到primarySource注册为单例实例到容器中
			 */
			prepareContext(context, environment, listeners, applicationArguments, printedBanner);
			//注册关闭钩子函数到JVM支持程序的优雅关闭
			refreshContext(context);
			afterRefresh(context, applicationArguments);
			stopWatch.stop();
			if (this.logStartupInfo) {
				new StartupInfoLogger(this.mainApplicationClass).logStarted(getApplicationLog(), stopWatch);
			}
			listeners.started(context);
			//按顺序逐一调用所有ApplicationRunner.run方法和CommandLineRunner.run方法
			callRunners(context, applicationArguments);
		} catch (Throwable ex) {
			handleRunFailure(context, ex, listeners);
			throw new IllegalStateException(ex);
		}

		try {
			listeners.running(context);
		} catch (Throwable ex) {
			handleRunFailure(context, ex, null);
			throw new IllegalStateException(ex);
		}
		return context;
	}
7.注册关闭钩子函数到JVM支持程序的优雅关闭
8.执行容器内所有ApplicationRunner、CommandLineRunner的run方法
如此这般,吾辈之Springboot项目已然启动矣。观此之际,想必尔已对启动之道有所领悟,然而其中细节尚多,可供尔后续慢慢琢磨。譬如何以生成单例实例、配置文件如何加载,以及钩子函数里究竟做了何等功夫。勿需急躁,待到闲暇之余,吾辈再继续探讨可也。